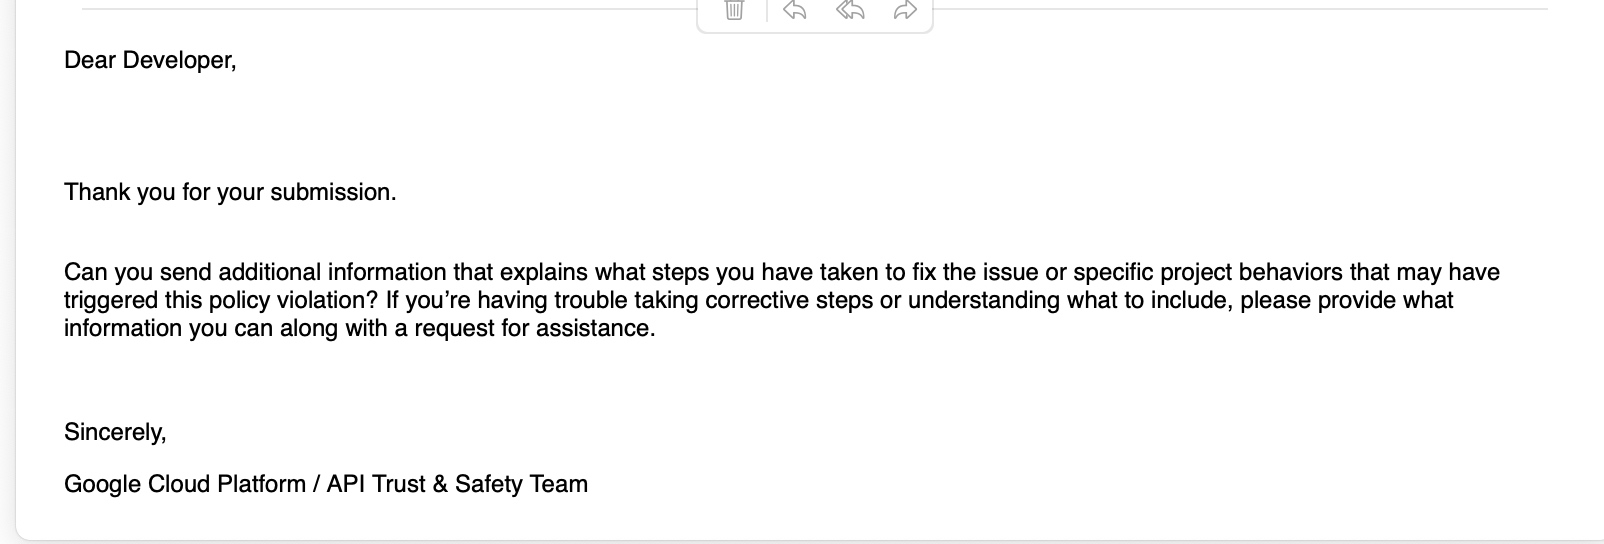
CGP的spot vm,不支持使用free tair credits,吓我一跳
实际是庸人自扰,因为我把free tier和free credits混淆在了一起。
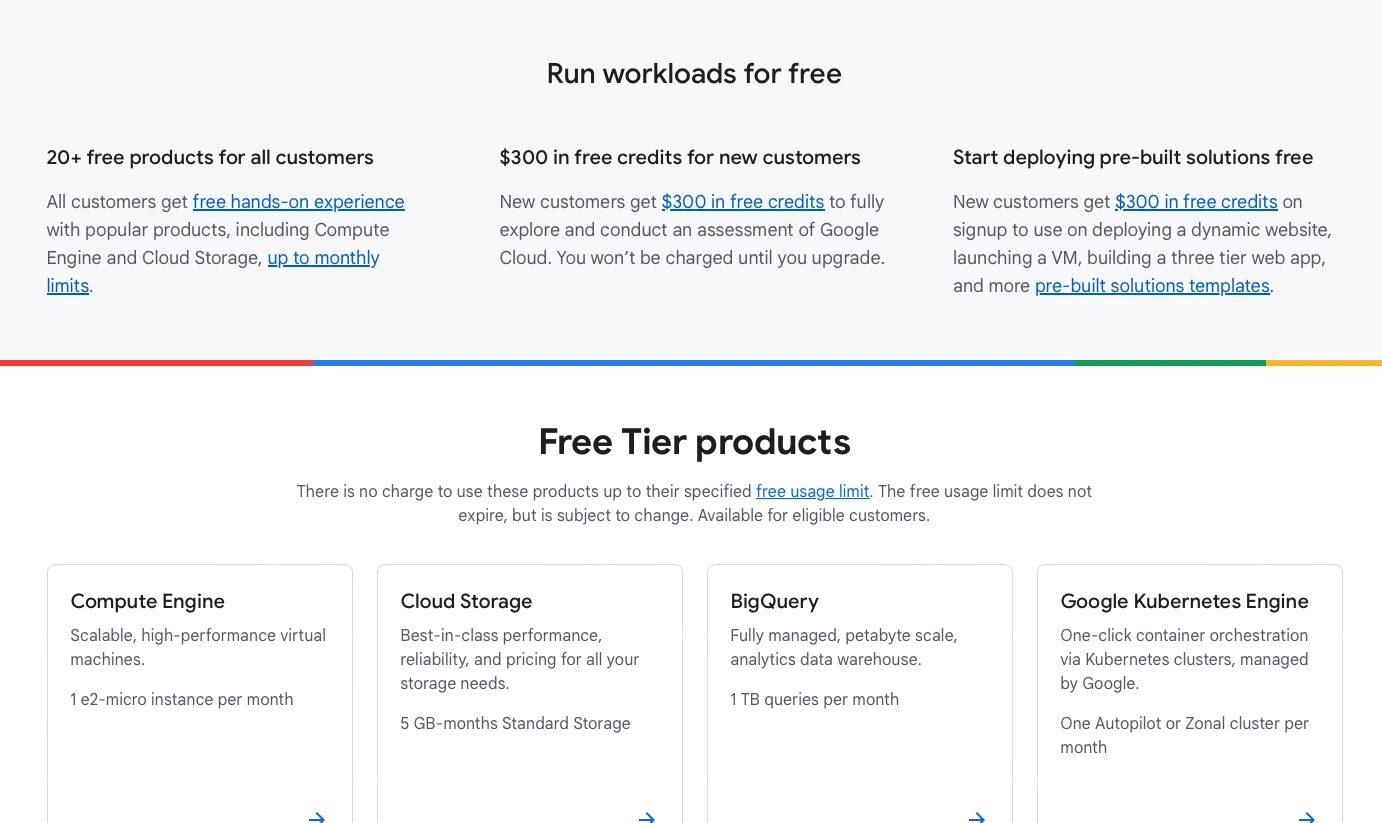
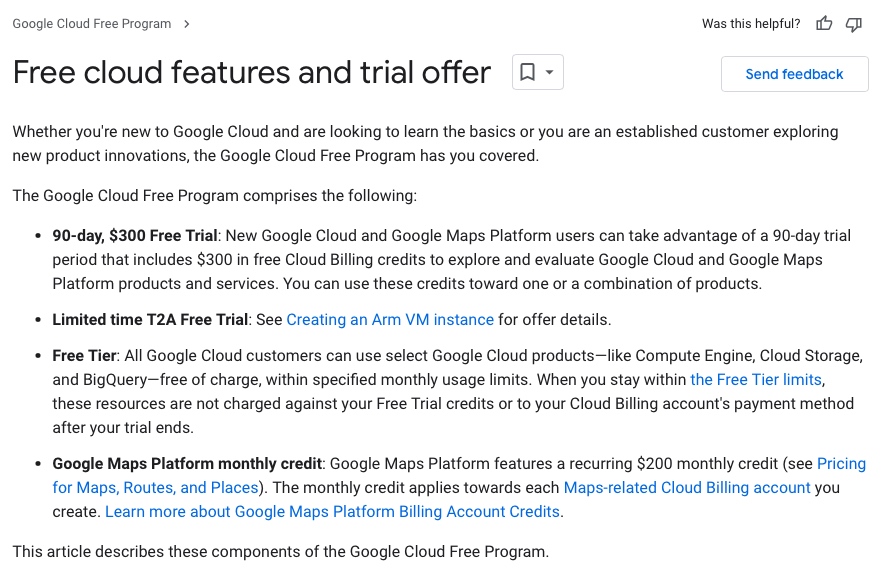
- free tier指用户可以免费、限量、限品种的使用部分google的服务,例如地图、计算资源等
- free credits指用户可以在注册成功后的90天内,免费获得300美金来购买google的各项服务。
CGP的spot vm,不支持使用free tair credits,吓我一跳
实际是庸人自扰,因为我把free tier和free credits混淆在了一起。
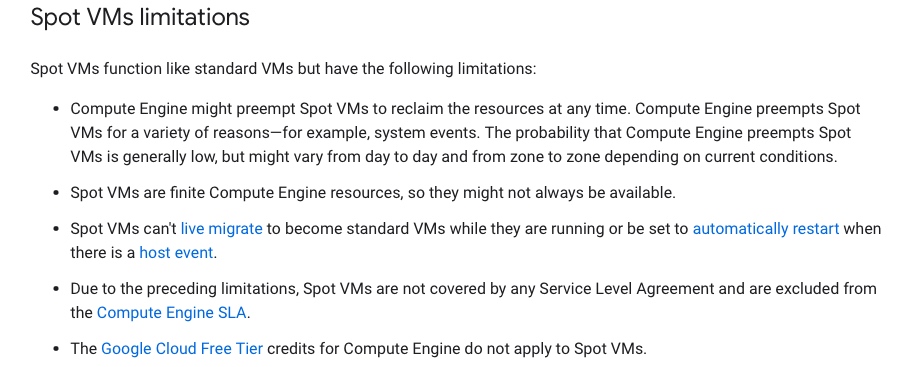
This page describes Spot VMs: virtual machine (VM) instances that are excess Compute Engine capacity. Spot VMs have significant discounts, but Compute Engine might preemptively stop or delete (preempt) Spot VMs to reclaim the capacity at any time. Spot VMs are the latest version of preemptible VMs.

The provisioning model of a VM affects its discounts and availability; Compute Engine VMs can use either the standard provisioning model (standard VMs) (default) or the spot provisioning model (Spot VMs). In contrast to standard VMs, Spot VMs are available at much lower prices but have lower availability because they are subject to preemption. Use Spot VMs to reduce costs for fault-tolerant workloads.

To learn more about Compute Engine VMs in general, read the Virtual machine instances documentation. To learn how to create Spot VMs, read Create and use Spot VMs.

What are Spot VMs?

Spot VMs are available at much lower prices—60-91% discounts for most machine types and GPUs as well as smaller discounts for local SSDs and A3 VMs—compared to the on-demand price for standard VMs. However, Compute Engine might preempt Spot VMs at any time, such as when it needs the resources for other tasks. At this uncertain preemption time, Compute Engine either stops (default) or deletes your Spot VMs depending on your specified termination action for each Spot VM. Spot VMs are excess Compute Engine capacity, so their availability varies based on Compute Engine usage. Spot VMs do not have a minimum or maximum runtime unless you specifically limit the runtime.

If your workloads are fault-tolerant and can withstand possible VM preemption, Spot VMs can reduce your Compute Engine costs significantly. For example, batch processing jobs can run on Spot VMs. If some of those VMs stop during processing, the job slows but does not completely stop. Spot VMs complete your batch processing tasks without placing additional load on your existing VMs and without requiring you to pay full price for additional standard VMs.
我们可以看到,在spot模式下,google vm可以便宜到0.01美元每小时
*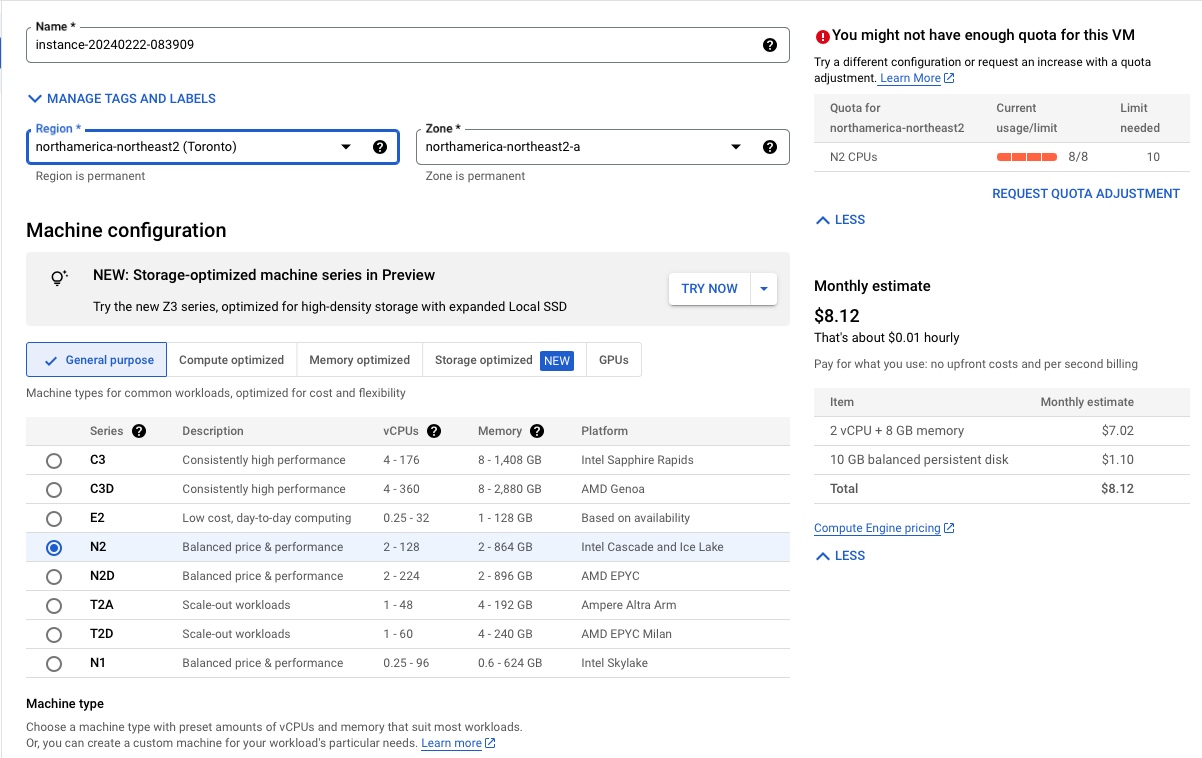
下面是我的选择
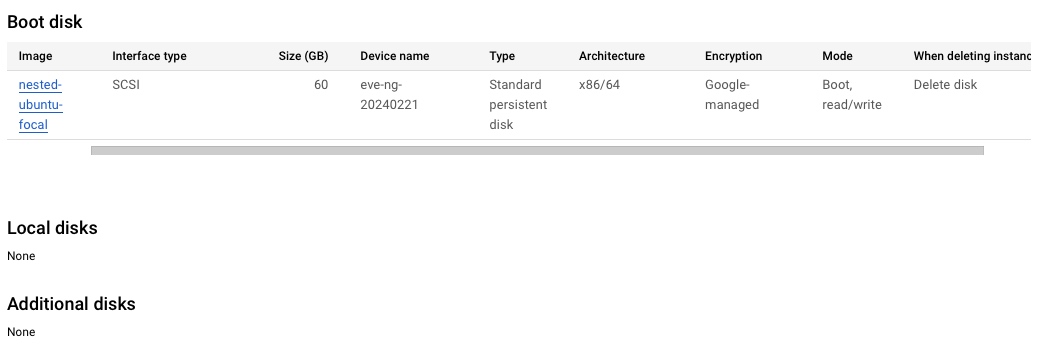
还可以更加丧心病狂,因为spot停机后是不收费的(硬盘和静态ip需要收费),那么我们再来一个定期停机,一切就完美了。
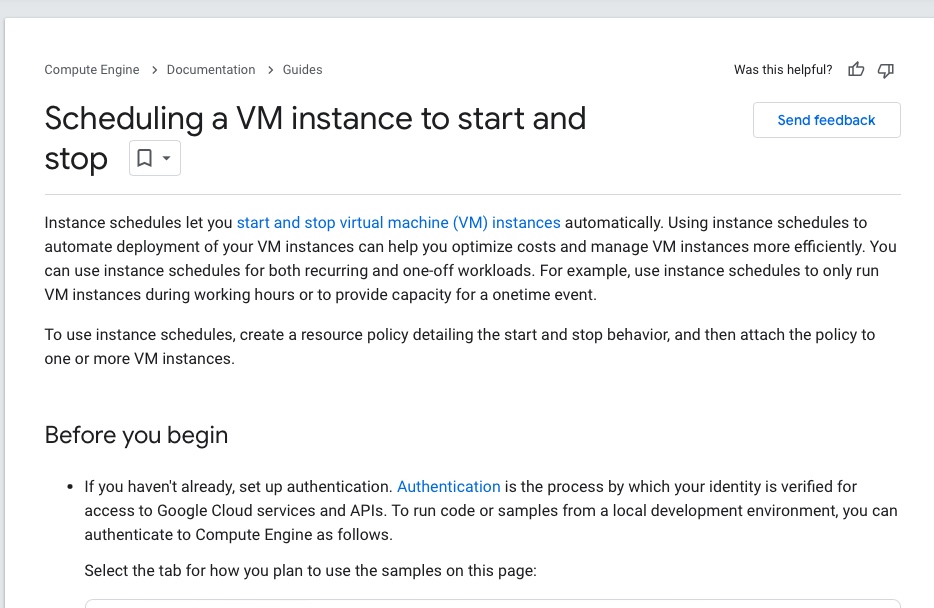
当完成定期计划来启停机器时,会出现如下告警
Compute Engine System service account service-111462968063@compute-system.iam.gserviceaccount.com needs to have [compute.instances.start] permissions applied in order to perform this operation.
参考下面的方案就能解决
Solution:
Wait a few minutes before trying to use the new permissions.

Cisco的iol/ios镜像文件
/opt/unetlab/wrappers/unl_wrapper -a fixpermissions
python3 CiscoIOUKeygen3f.py
cd /opt/unetlab/addons/iol/bin
touch NETMAP
LD_LIBRARY_PATH=/opt/unetlab/addons/iol/lib /opt/unetlab/addons/iol/bin/<iosname.bin> 1

***************************************************************
IOS On Unix - Cisco Systems confidential, internal use only
Under no circumstances is this software to be provided to any
non Cisco staff or customers.  To do so is likely to result
in disciplinary action. Please refer to the IOU Usage policy at
wwwin-iou.cisco.com for more information.
***************************************************************

              Restricted Rights Legend

Use, duplication, or disclosure by the Government is
subject to restrictions as set forth in subparagraph
(c) of the Commercial Computer Software - Restricted
Rights clause at FAR sec. 52.227-19 and subparagraph
(c) (1) (ii) of the Rights in Technical Data and Computer
Software clause at DFARS sec. 252.227-7013.

           cisco Systems, Inc.
           170 West Tasman Drive
           San Jose, California 95134-1706
Cisco的其他镜像文件
1.
华为的镜像文件
1.
华三的镜像文件
1.
春节在家,一直到初五都没闲着,这几天主要是在折腾eve-ng,装了2台mac电脑,还有一个google cloud,用下来还是gcp给力,毕竟300美金不是闹着玩的。
说google cloud的之前,得先唠叨下我去年申请的oracle cloud,号称永久免费的云,虽然配置不怎么地,胜在免费,用下来挺不错,唯一不爽的是一直要登录oracle的shell,今天突然发现,使用token的方式,与ssh密码登录是不矛盾的,只能怪自己学艺不精吧
vi /etc/ssh/sshd.conf
在上面的配置文件里,修改两个地方
然后重新启动ssh服务
systemctl restart sshd
就可以实现ssh登录了
为什么要折腾google cloud呢?按理说我自己的目标是在aws找一个网工的职业,在苦寒之地可以不用洗盘子和在超市搬货。所以在我寻找eve-ng这个软件的部署方式时,突然发现原来是可以在云主机上部署的,唯一的特殊要求是,需要支持nested,也就是在虚拟机套娃(在一台虚拟机里,再安装一台虚拟机),这个时候就要用到一个比较特殊的技术,vmx,也就是允许虚拟机把硬件资源开放出来,让套娃虚拟机继续使用,和我们搞gpu的passthrough很类似,很可惜,国内的阿里云是不支持这样做的,目测下来只有google cloud支持的比较好。
所以早晨抓紧时间,利用目前google的优惠政策,申请了一台3个月的免费主机,算下来,3个月我也能在网络技术方面小有所成了。
下面是这次的几个心得
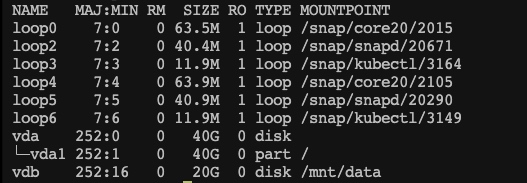
今天打算在阿里云上安装eve-ng,感觉磁盘空间可能不足,打开控制台,发现还有一个20G的数据盘,觉得勉强够用,就直接在终端上通过lsblk查看
[MDaliyun ~]# lsblk
NAME   MAJ:MIN RM  SIZE RO TYPE MOUNTPOINT
loop0    7:0    0 63.5M  1 loop /snap/core20/2015
loop2    7:2    0 40.4M  1 loop /snap/snapd/20671
loop3    7:3    0 11.9M  1 loop /snap/kubectl/3164
loop4    7:4    0 63.9M  1 loop /snap/core20/2105
loop5    7:5    0 40.9M  1 loop /snap/snapd/20290
loop6    7:6    0 11.9M  1 loop /snap/kubectl/3149
vda    252:0    0   40G  0 disk
└─vda1 252:1    0   40G  0 part /
vdb    252:16   0   20G  0 disk
好家伙,这一看不要紧,发现vdb这块盘虽然启动2年了,但是一直没有挂载,就这么白白浪费了2年!
马上格式化,挂载,把它用起来,为了省事,直接让chatgpt出马:
The output /dev/vdb: data from the file -s /dev/vdb command indicates that the /dev/vdb block device does not have a recognizable filesystem or partition table. This typically means that the disk is either unformatted or contains raw data that is not structured in a manner recognized by the file command.

Given this situation, if you intend to use /dev/vdb for storage, the next steps would involve creating a filesystem on it. Here's how you can do it:

Create a Filesystem on /dev/vdb
Choose a Filesystem Type: Decide on the type of filesystem you want to create. Common choices include ext4 for general use, xfs for high-performance environments, and btrfs for systems requiring advanced features like snapshotting.
Create the Filesystem: Use the mkfs command to create a filesystem. For example, to create an ext4 filesystem on /dev/vdb, you would use:
bash
Copy code
mkfs.ext4 /dev/vdb
Replace ext4 with your filesystem of choice if different.
Mount the Filesystem
After creating the filesystem, you can mount it to make the storage available for use:

Create a Mount Point: This is the directory where the disk's contents will be accessible. For example, to create a mount point at /mnt/data, use:
bash
Copy code
mkdir /mnt/data
Mount the Disk: Mount the newly formatted disk to the mount point:
bash
Copy code
mount /dev/vdb /mnt/data
Ensure Persistent Mounting Across Reboots
To automatically mount the disk after a reboot, you'll need to add an entry to the /etc/fstab file:

Find the UUID of /dev/vdb: The UUID is a unique identifier for the disk, which is preferable to use in the /etc/fstab file instead of the device name (/dev/vdb) since it won't change between reboots.
bash
Copy code
blkid /dev/vdb
Edit /etc/fstab: Add a line to this file with the disk's UUID and mount information. Open the file in a text editor (like nano or vi), and add a line similar to:
plaintext
Copy code
UUID=<your-uuid> /mnt/data ext4 defaults 0 2
Replace <your-uuid> with the actual UUID you obtained from the blkid command.
使用mkfs.ext4这个命令,作为通用存储,结果如下:
[MDaliyun ~]# mkfs.ext4 /dev/vdb
mke2fs 1.45.5 (07-Jan-2020)
Creating filesystem with 5242880 4k blocks and 1310720 inodes
Filesystem UUID: 811e4057-5c8b-45e2-8fb9-40e023ec72cc
Superblock backups stored on blocks:
        32768, 98304, 163840, 229376, 294912, 819200, 884736, 1605632, 2654208,
        4096000

Allocating group tables: done
Writing inode tables: done
Creating journal (32768 blocks): done
Writing superblocks and filesystem accounting information: done
然后挂在在data下面:
[MDaliyun /]# mkdir /mnt/data
/
[MDaliyun /]# file -s /dev/vdb
/dev/vdb: Linux rev 1.0 ext4 filesystem data, UUID=811e4057-5c8b-45e2-8fb9-40e023ec72cc (extents) (64bit) (large files) (huge files)
[MDaliyun /]# mount /dev/vdb /mnt/data
[MDaliyun /]# blkid /dev/vdb
/dev/vdb: UUID="811e4057-5c8b-45e2-8fb9-40e023ec72cc" TYPE="ext4"
再使用lsblk看看,成功了
不过正事还没有完,eve-ng是虚拟机,没法在已经虚拟化的机器上安装(阿里云不支持vmx,也就是硬件已经使用了一次kvm的vmx,虚拟机里就无法支持二次的vmx了),但是我的本地电脑也没有空间继续安装vmware,如何是好?
https://zhuanlan.zhihu.com/p/548997684
我们知道,在Intel处理器上,KVM使用Intel的vmx(virtul machine eXtensions)来提高虚拟机性能, 即硬件辅助虚拟化技术, 现在如果我们需要测试一个openstack集群,又或者单纯的需要多台具备"vmx"支持的主机, 但是又没有太多物理服务器可使用, 如果我们的虚拟机能够和物理机一样支持"vmx",那么问题就解决了,而正常情况下,一台虚拟机无法使自己成为一个hypervisors并在其上再次安装虚拟机,因为这些虚拟机并不支持"vmx"

嵌套式虚拟nested是一个可通过内核参数来启用的功能。它能够使一台虚拟机具有物理机CPU特性,支持vmx或者svm(AMD)硬件虚拟化。